
How to brighten photos with the Adjustment Brush | lynda.com tutorial
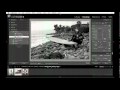
This Photoshop Lightroom tutorial shows how to brighten an image using the Adjustment Brush. Watch more at www.lynda.com This specific tutorial is just a single movie from chapter four of the Photoshop Lightroom 3 New Features course presented by lynda.com author Chris Orwig. The complete Photoshop Lightroom 3 New Features course has a total duration of 3 hours and 32 minutes and details Lightroom 3’s new importing and asset-management features and its significant improvements in the Develop module, including enhanced sharpening and noise reduction. Photoshop Lightroom 3 New Features table of contents: Introduction 1. Importing to the Library 2. Library Workflow 3. Exporting from the Library 4. Adjusting Image Quality in the Develop Module 5. The Slideshow Module 6. Creating Custom Print Packages 7. Tethered Shooting 8. Working with Catalogs and Legacy Files 9. Additional Lightroom Enhancements Conclusion
Video Tutorial Rating: 5 / 5
Don’t forget to check out our other video tutorials or share this video with a friend.
 0 votes
5 responses to “How to brighten photos with the Adjustment Brush | lynda.com tutorial”
Leave a Reply
Video Tutorials
Bringing you the best video tutorials for Photoshop, Illustrator, Fireworks, WordPress, CSS and others.
Video tutorial posted 06/10/12

Pages
Random Videos
-
-
HTML CSS Tutorial – Lesson 5 (Inline Styling)
8,042 views
-
Adobe Illustrator CS6 Pen Tool Tutorial
2,375 views
-
HTML Tutorial For Beginners – Part 1
7,899 views
Video Categories
- 3DS Max Tutorials (150)
- After Effects Tutorials (160)
- C# Tutorials (121)
- Colour (6)
- Crazy Effects (1)
- CSS Tutorials (120)
- Dreamweaver Tutorials (139)
- Excel Tutorials (127)
- Featured (10)
- Fireworks Tutorials (131)
- General Effects (9)
- HTML Tutorials (143)
- Illustration and Vector (1)
- Illustrator Tutorials (174)
- IMove Tutorials (119)
- Lightroom Tutorials (145)
- People and Faces (3)
- Photoshop Tutorials (169)
- Text Effects (7)
- Uncategorized (32)
- WordPress Tutorials (140)
Tags
VideoTutorials.co.uk
-
Videotutorials.co.uk offers the web's best Photoshop tutorials, Illustrator video guides, CSS and HTML tutorials and much more all in one place. With new videos being added every day, you can learn how to master software and code to give your images and website some great effects.
Our site has beginner, intermediate and advanced video tutorials of varying lengths so you can learn a new skill at your own speed and level. So whether you're a web designer, print designer or just wanting to edit some family photos, you can get to it quickly and easily using these free video guides. (more)
the brush stopped working.. nothing happens when i press anywhere :s
Thank you, thank you, thank you!!!!!!
thank you so much u r the best 🙂
Oh wow.. thank you. I was wondering how to use the adjustment brush because i was busy clicking the pin and dragging left right, I didn’t know that we could ‘paint’..thanks so much 🙂
Excellent. It made me use the tool for the first time.
Thank you