
mCloth – 3DS Max 2013 Tutorial. Level: intermediate. Part 1
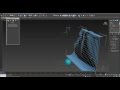
3DS Max Tutorial on MCloth, the new Cloth Simulation system in 3ds max 2013. This tutorial will show you how to implement it and have it react with rigid body objects.
Video Tutorial Rating: 4 / 5
Don’t forget to check out our other video tutorials or share this video with a friend.
 0 votes
19 responses to “mCloth – 3DS Max 2013 Tutorial. Level: intermediate. Part 1”
Leave a Reply to KevinHarper3DArtist Cancel reply
Video Tutorials
Bringing you the best video tutorials for Photoshop, Illustrator, Fireworks, WordPress, CSS and others.
Video tutorial posted 09/11/12
Category: 3DS Max Tutorials

Pages
Random Videos


Video Categories
- 3DS Max Tutorials (150)
- After Effects Tutorials (160)
- C# Tutorials (121)
- Colour (6)
- Crazy Effects (1)
- CSS Tutorials (120)
- Dreamweaver Tutorials (139)
- Excel Tutorials (127)
- Featured (10)
- Fireworks Tutorials (131)
- General Effects (9)
- HTML Tutorials (143)
- Illustration and Vector (1)
- Illustrator Tutorials (174)
- IMove Tutorials (119)
- Lightroom Tutorials (145)
- People and Faces (3)
- Photoshop Tutorials (169)
- Text Effects (7)
- Uncategorized (32)
- WordPress Tutorials (140)
Tags
VideoTutorials.co.uk
-
Videotutorials.co.uk offers the web's best Photoshop tutorials, Illustrator video guides, CSS and HTML tutorials and much more all in one place. With new videos being added every day, you can learn how to master software and code to give your images and website some great effects.
Our site has beginner, intermediate and advanced video tutorials of varying lengths so you can learn a new skill at your own speed and level. So whether you're a web designer, print designer or just wanting to edit some family photos, you can get to it quickly and easily using these free video guides. (more)
f4
There are no Segs shown on my mCloth/Sphere etc, how can i make them visible?
i can’t hear your VOICE! To check ur video before upload.
very good the tutorial! congrats
You are welcome. Feel free to Subscribe if you like. I am working on some other tutorials that I am launching soon.
Already done and loved all three parts 🙂
Totally agree with you after this clarification. You have to know when and how much turbosmooth you can use while staying in the “safe” zone. Thanks for sharing!
note also that this is part one of a 3 part tutorial so feel free to check out the other parts if you are interested.
You are correct, it is a balance between having too many calculations and a slow simulation and too few calculations that returns results that are not very accurate. However, if you are doing a high quality render, you will always put a Turbosmooth on top b/c you would never want to calculate 100s of thousands of Vertices. Thanks for the comment.
Nice tutorial, really liked it but I partially disagree with applying a turbosmooth AFTER the physical simulation has taken place. It will speed things up a little, true, but there is a higher chance of getting artifacts and getting an “artificial” look to the animation, correct me if I’m wrong. Thanks again!
You are welcome
Thank You! it works! 😀
oh god watch it with captions on xD
right click on the top toolbar and click on MassFX
i cant see physx toolbar on 3dsmax 2013 so is massfx ?? is the physx toolbar? in 2013?
haha que estupido que eres xD
You are welcome
Thank you, A very nice tutorial
You are welcome.
really helpful tutorial. thanks.
i have a problem in maya 2013
every frame is devided in 100 miliframes
for exemple from freme 1 to 2 are 1.01 1.02 … 1.23 … 1.56 … 1.99 and 2
is realy annoying
how can i desable this ?