
HTML Tutorial 3 – Adding Images & Backgrounds To Your HTML Website
In this HTML website design tutorial I will teach you how to add images to your website/html document and how to add an image to the background. Difficulty Level: Easy/Beginner If you have any problems or need help with any of this tutorial please leave a comment below or message me on YouTube.
Video Tutorial Rating: 4 / 5
Don’t forget to check out our other video tutorials or share this video with a friend.
 0 votes
18 responses to “HTML Tutorial 3 – Adding Images & Backgrounds To Your HTML Website”
Leave a Reply to wenoyol123 Cancel reply
Video Tutorials
Bringing you the best video tutorials for Photoshop, Illustrator, Fireworks, WordPress, CSS and others.
Video tutorial posted 21/06/12
Category: HTML Tutorials

Pages
Random Videos


Video Categories
- 3DS Max Tutorials (150)
- After Effects Tutorials (160)
- C# Tutorials (121)
- Colour (6)
- Crazy Effects (1)
- CSS Tutorials (120)
- Dreamweaver Tutorials (139)
- Excel Tutorials (127)
- Featured (10)
- Fireworks Tutorials (131)
- General Effects (9)
- HTML Tutorials (143)
- Illustration and Vector (1)
- Illustrator Tutorials (174)
- IMove Tutorials (119)
- Lightroom Tutorials (145)
- People and Faces (3)
- Photoshop Tutorials (169)
- Text Effects (7)
- Uncategorized (32)
- WordPress Tutorials (140)
Tags
VideoTutorials.co.uk
-
Videotutorials.co.uk offers the web's best Photoshop tutorials, Illustrator video guides, CSS and HTML tutorials and much more all in one place. With new videos being added every day, you can learn how to master software and code to give your images and website some great effects.
Our site has beginner, intermediate and advanced video tutorials of varying lengths so you can learn a new skill at your own speed and level. So whether you're a web designer, print designer or just wanting to edit some family photos, you can get to it quickly and easily using these free video guides. (more)
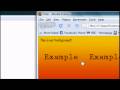
Don’t name it as image.jpg, just image or whatever you want to call it. Then in background=”” you put image.jpg if it is jpg.
WTF y is he always wearing that scarf
1:36 OMG “Hack Forums”
Like this tutorial.
Also, do you have to make a new folder for it?
My image isnt showing… it has an x and I put it in the same file as the pix. Does it have to be in a seprate file?
thanks for dis video bro. but my image is still not showing even d image is on d same folder as d webpage
help me
ive done it 50 times and over
the jpeg img seems to have an error everytime
its not working!
:'(
do .jpeg
@below. So.?
What does src mean and can u type bg instead if background?
Awesome tutorial btw very handy
Solved!
Okey For me the picture doesn´t show
how do i just use the image one time instead of it repeating itself?? like streach out the whole thing??
hey bud i had this problem to solve this open up paint drag you jpg picture in to paint and make shore you dont have a white border round your photo and click save as then at the bottom bellow the name of the photo change it from jpg to .png if you would like a video tutorial just let me know bud hope this helps you
right click : “edit” then in paint do “save as” and save it as “png” : problem solved 😉
My website is starting to look awesome.