
Lightroom tutorial-Professional Portrait in 6 easy steps…using JPEG?!
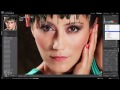
JOIN ME FOR A PHOTO WALK ON SUNDAY, APRIL 15, 2012 @3PM. I will be there to provide you live tips and answers to your photography questions. We will meet at the Griffith Observatory in Los Angeles. Please follow this link to sign up meetu.ps — Hope to see you all there! CLICK HERE TO SIGN UP FOR MY MONTHLY NEWS LETTER: eepurl.com Pick up an “OH SNAP” T-Shirt! kreativevuetv.spreadshirt.com After a few request I have begun putting together more tutorials on how to apply post production techniques to your images using Lightroom and Adobe RAW. In this tutorial I show you how to achieve a professional looking portrait in 6 easy to follow steps. Although there are several different ways to achieve this look, I walk you through my workflow using the minimal tools for maximum outcomes. To top it all off, I’m using a JPEG file to edit. I just want to show that it is possible to edit with JPEG if your conditions are right. Thanks for watching, please leave your comments and questions below!
Video Tutorial Rating: 4 / 5
Don’t forget to check out our other video tutorials or share this video with a friend.
 0 votes
16 responses to “Lightroom tutorial-Professional Portrait in 6 easy steps…using JPEG?!”
Leave a Reply
Video Tutorials
Bringing you the best video tutorials for Photoshop, Illustrator, Fireworks, WordPress, CSS and others.
Video tutorial posted 04/07/12
Tags: easy, JPEG, Lightroom, Portrait, steps...using, tutorialProfessional

Pages
Random Videos

Video Categories
- 3DS Max Tutorials (150)
- After Effects Tutorials (160)
- C# Tutorials (121)
- Colour (6)
- Crazy Effects (1)
- CSS Tutorials (120)
- Dreamweaver Tutorials (139)
- Excel Tutorials (127)
- Featured (10)
- Fireworks Tutorials (131)
- General Effects (9)
- HTML Tutorials (143)
- Illustration and Vector (1)
- Illustrator Tutorials (174)
- IMove Tutorials (119)
- Lightroom Tutorials (145)
- People and Faces (3)
- Photoshop Tutorials (169)
- Text Effects (7)
- Uncategorized (32)
- WordPress Tutorials (140)
Tags
VideoTutorials.co.uk
-
Videotutorials.co.uk offers the web's best Photoshop tutorials, Illustrator video guides, CSS and HTML tutorials and much more all in one place. With new videos being added every day, you can learn how to master software and code to give your images and website some great effects.
Our site has beginner, intermediate and advanced video tutorials of varying lengths so you can learn a new skill at your own speed and level. So whether you're a web designer, print designer or just wanting to edit some family photos, you can get to it quickly and easily using these free video guides. (more)
Hello. You can adjust the brush sizes by using the bracketing keys located right next to the letter “P”. If you’re using a Mac, then you can slide two fingers up and down on your mouse or trackpad. Hope this helps!
How you change the size of the circle when you are working with a brush but with the keyboard???
I have Lightroom 4 and i can’t find a “Fill Light” adjuster?
Very Interesting
It’s funny that a lot of people who own Macs don’t know that they can actually record on screen using Quicktime. It allows you to recored at 1080p. I also use my zoom H1 for the audio.
how do you make a tutorial? I mean how do you make the video so I can see your screen?
Thanks for the video…. learned some cool stuff
Thank you for the video, it is one of the best tutorials I have seen. Every video wants to play music in the background, thank for talking us through. Sometimes I can’t see what they are clicking on but you tell what you are working on. Thank You
Thank you I need more of these tutorials for light room I think I do to much in Lightroom sometime everyone looks like cartoons
Thank you for this video, it’s really helping.
But please – talk to the mic
Ya you are right nd i used to click on RAW only before, but it made me lazy you knw just forget the exposure triangle click it and i will fix it in LR .
But with JPEG you have to get things perfect i mean at the learning stage JPEG is good just to know the diffrent exposure settings and to play with the Manual stuff
But ya i shoot Raw when some details are involved . But thats why i asked you to make a tutorial on JPEG landscapes cuz people have P&S camera and only JPEG , might be good for them
Thank you very much for the reply, I know camera Raw that is why I said that untill CS6 comes out Lightroom will have the edge over Ps. Is there a way to go from PS to lightroom I think you can save the raw file back to Raw when done retouching.
You can export any image from lightroom into photoshop, which will create a copy for you there, while retaining any adjustments you’ve made in lightroom. Photoshop has its equivalent of Lightroom’s post tools available called “Camera RAW”. If you open up RAW files in photoshop, it should automatically open up Camera RAW.
Thanks for watching and the feedback, I will look into the audio.
Hello and thank you for watching my vid! I will see about putting together a vid on that subject since I’ve gotten a few similar requests. I will leave you with this food for thought…When shooting landscapes, I would strongly suggest shooting RAW as this is your insurance. Your ability to manipulate colors, light, shadows is much greater as RAW carries much more information. RAW give you that assurance that if it doesn’t come out the way you expected, you can always fix it later. Thx again!
I’ll have to side with @himanshucisco1, as both have their purposes. Lightroom affords you the ability to organize your photo library as well as provide you with very powerful editing tools. However true, this does not eliminate the need to use photoshop, as Lightroom does have its limits. Photoshop does have it’s “Lightroom” equivalent, which is called “Camera RAW”. This will essentially give you the same tools as Lightroom. Again, Lightroom combines the best of 2 worlds.