
Lightroom Tutorial: Black and White Images (Converting and Editing)

In this Lightroom Tutorial, I am going to teach you how to covert your colored images into black and white images, and how to edit them. LIKE and SHARE the video if it helped! It really helps the channel grow! — All Rights Reserved. — YOUTUBE: www.youtube.com TWITTER: www.twitter.com FACEBOOK: www.facebook.com CAMCRUNCH: www.camcrunch.com CAMCRUNCH videos are filmed and editted with Canon EOS 5D Mark II DSLR Canon EF 24-105 f/4 IS L Canon EF 50 f/1.8 Canon EF 17-40 F/4 L Zoom H1 Recorder CamerCanon PowerShot ELPH 300 HS Apple MacBook Pro 15 inch i5 Adobe Premier Pro AKG Perception 220 Condenser Microhpone Focusrite Scarlett 2i2 Audio Interface Lightroom Tutorial: Black and White Images (Converting and Editing) Lightroom Tutorial: Black and White Images (Converting and Editing) Lightroom Tutorial: Black and White Images (Converting and Editing) Lightroom Tutorial: Black and White Images (Converting and Editing)
Video Tutorial Rating: 4 / 5
Don’t forget to check out our other video tutorials or share this video with a friend.
 0 votes
19 responses to “Lightroom Tutorial: Black and White Images (Converting and Editing)”
Leave a Reply to haijec Cancel reply
Video Tutorials
Bringing you the best video tutorials for Photoshop, Illustrator, Fireworks, WordPress, CSS and others.
Video tutorial posted 08/08/12

Pages
Random Videos
-
Diffusion Photoshop Video Tutorial
5,453 views
-

HTML Email Design Tutorial
3,267 views
-
HTML Tutorial Tabs
2,484 views
-

Video Categories
- 3DS Max Tutorials (150)
- After Effects Tutorials (160)
- C# Tutorials (121)
- Colour (6)
- Crazy Effects (1)
- CSS Tutorials (120)
- Dreamweaver Tutorials (139)
- Excel Tutorials (127)
- Featured (10)
- Fireworks Tutorials (131)
- General Effects (9)
- HTML Tutorials (143)
- Illustration and Vector (1)
- Illustrator Tutorials (174)
- IMove Tutorials (119)
- Lightroom Tutorials (145)
- People and Faces (3)
- Photoshop Tutorials (169)
- Text Effects (7)
- Uncategorized (32)
- WordPress Tutorials (140)
Tags
VideoTutorials.co.uk
-
Videotutorials.co.uk offers the web's best Photoshop tutorials, Illustrator video guides, CSS and HTML tutorials and much more all in one place. With new videos being added every day, you can learn how to master software and code to give your images and website some great effects.
Our site has beginner, intermediate and advanced video tutorials of varying lengths so you can learn a new skill at your own speed and level. So whether you're a web designer, print designer or just wanting to edit some family photos, you can get to it quickly and easily using these free video guides. (more)
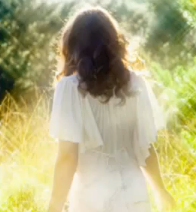
Yup, I like the colored version as well (: Thanks for watching!
the photo looks great with colors as well as in b&w
great tutorial thank you 🙂
Lightroom Tutorial: Black and White Images (Converting and Editing)
Awesome! Thanks!
Thanks!
Thank you so much for your tutorial. I wasn’t exactly sure what to do with all the color slider, now I know.
Very nice tutorial !
Yup, I forgot to mention that. It still affects all the similar colors in the photo, and not jus that specific area. Awesome that you reminded me, THUMBS UP haijec’s comment so that people can see!
in the b&w panel there is a little circle in the top left. click on that, then in the image itself click and hold of the portion of it you want to adjust then drag the mouse up or down and you will see the sliders associated with the underlying colours move. This works great because often times the portion of the image you want to adjust is a combination of colours and not just a single colour.
Yup, fully aware. I forgot to do it for this one. It doesn’t change anything though, the Black and White process is still the same.
Hey man, are you aware that you have to click on the ! at the bottom to upgrade your images to Lightroom 4?
Thanks! :D
Thanks for watching!
Hey man, love your vids. Just got yourself a new subscriber 😉
yes i dose notice in you photo man.
Thanks man, I also didn’t realize you could use the b&w mix to adjust colors like that.
Yup, it can definitely make a difference!
I think that if you open a raw image, you might be able to work with it the same way.
Nice photo like it and i didn’t know you could could make some colors darker or lighter.