
Adobe Photoshop CC – Remove/Change Background – Quick Selection Tool – Beginners Tutorial
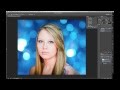
Adobe Photoshop CC – Remove/Change Background – Quick Selection Tool – Beginners Tutorial VIDEO HAS BEEN UPDATED USING LAYER MASK: http://youtu.be/vH0Jm9lcoX…
Video Tutorial Rating: 4 / 5
Don’t forget to check out our other video tutorials or share this video with a friend.
 0 votes
24 responses to “Adobe Photoshop CC – Remove/Change Background – Quick Selection Tool – Beginners Tutorial”
Leave a Reply to Rigon Sierra Cancel reply
Video Tutorials
Bringing you the best video tutorials for Photoshop, Illustrator, Fireworks, WordPress, CSS and others.
Video tutorial posted 09/09/14
Category: Photoshop Tutorials
Tags: Adobe, Background, Beginners, Photoshop, Quick, Remove/Change, Selection, Tool, Tutorial

Pages
Random Videos
Video Categories
- 3DS Max Tutorials (150)
- After Effects Tutorials (160)
- C# Tutorials (121)
- Colour (6)
- Crazy Effects (1)
- CSS Tutorials (120)
- Dreamweaver Tutorials (139)
- Excel Tutorials (127)
- Featured (10)
- Fireworks Tutorials (131)
- General Effects (9)
- HTML Tutorials (143)
- Illustration and Vector (1)
- Illustrator Tutorials (174)
- IMove Tutorials (119)
- Lightroom Tutorials (145)
- People and Faces (3)
- Photoshop Tutorials (169)
- Text Effects (7)
- Uncategorized (32)
- WordPress Tutorials (140)
Tags
VideoTutorials.co.uk
-
Videotutorials.co.uk offers the web's best Photoshop tutorials, Illustrator video guides, CSS and HTML tutorials and much more all in one place. With new videos being added every day, you can learn how to master software and code to give your images and website some great effects.
Our site has beginner, intermediate and advanced video tutorials of varying lengths so you can learn a new skill at your own speed and level. So whether you're a web designer, print designer or just wanting to edit some family photos, you can get to it quickly and easily using these free video guides. (more)
I design them myself. I’m working on a couple of videos do similar ones in
illustrator.
hello.you seem to know how to use the photoshop,so i need something.for you
it would be about 5 minutes of your time,for me some decades.so my e-mail
is chiki7@hotmail.gr if you could help me erase just a thing.thank you
anyway.
Wait, You didn’t tell us how to click finish and save the file LOL I’m
having problem with finishing it…cause i don’t know what to click to
finish editing…When i click save…it’s still into photoshop format image
file.
i like the girl !! LOL
Actually, no you can save this file as a psd and then select what format
for there. Photoshop will automatically flatten it for you.
well, everyone should know this without having to look at a tutorial…
You need to change the layer setting. If it has a lock symbol next to it
your layer you might need to duplicate that image and delete the original
or click on the lock and unlock it. I’ll work on a layers video soon.
You probably didn’t have the image “selsected” in your layers panel.
Whenever you select anything make sure you’re layer is selected before you
try to make any changes to it. Hope that helps.
I’ve always wondered how to do this!! Thanks alot!
Helpfull..:D
IT WONT LET ME CLICK DUPLICATE. HOW DO YOU CLICK IT? BY CLICKING THE RIGHT
CLICK? PLS REPLY ASAP
Yes, and no… check out the follow up video.
The main subject needs to be the top layer.
Finally, thanx man, ur d best
I have my image and background and I layered them, but how do I put my
picture in my background?
Theres three issue that come to mind with what you’re experiencing: 1)You
might need to check your resolution. You should work with a resolution of
300dpi. Go to Image > image size to check this. 2) When you’re saving in a
jpg make sure to save it medium quality or above. 3) You need to be working
with pictures of 300 or more (depending on the project.) If not when you
expand the image everything will be distorted and blurred. You can show me
the file on fb. THe links in the description
Thanks!
Thankyou !! Damn ps =]
Great video. Thank you. thank you thank you. Keep it up. I totally subed
and cant wait to see what other PSE tutorials you come out with.
What do you mean a “hats” or “snapback”?
What if the quick select tool is affecting all layers
where you get the backgrounds.
Thank you michael jackson 🙂
Hey… What do you mean? Did you duplicate the original background? Your
first layer must be duplicate and the original deleted. Then add the new
background and move the duplicated layer above the new background. Make
sense?