
3ds Max Tutorial – Organic Form in 3ds Max
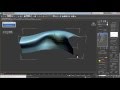
This video shows some different options to model a form that was done in Revit. You can import from Revit, but someone asked me to make the video on how I might model this shell in 3ds Max.
Video Tutorial Rating: 4 / 5
Don’t forget to check out our other video tutorials or share this video with a friend.
 0 votes
17 responses to “3ds Max Tutorial – Organic Form in 3ds Max”
Leave a Reply to John Malcolm Cancel reply
Video Tutorials
Bringing you the best video tutorials for Photoshop, Illustrator, Fireworks, WordPress, CSS and others.
Video tutorial posted 26/03/15
Category: 3DS Max Tutorials

Pages
Random Videos


Video Categories
- 3DS Max Tutorials (150)
- After Effects Tutorials (160)
- C# Tutorials (121)
- Colour (6)
- Crazy Effects (1)
- CSS Tutorials (120)
- Dreamweaver Tutorials (139)
- Excel Tutorials (127)
- Featured (10)
- Fireworks Tutorials (131)
- General Effects (9)
- HTML Tutorials (143)
- Illustration and Vector (1)
- Illustrator Tutorials (174)
- IMove Tutorials (119)
- Lightroom Tutorials (145)
- People and Faces (3)
- Photoshop Tutorials (169)
- Text Effects (7)
- Uncategorized (32)
- WordPress Tutorials (140)
Tags
VideoTutorials.co.uk
-
Videotutorials.co.uk offers the web's best Photoshop tutorials, Illustrator video guides, CSS and HTML tutorials and much more all in one place. With new videos being added every day, you can learn how to master software and code to give your images and website some great effects.
Our site has beginner, intermediate and advanced video tutorials of varying lengths so you can learn a new skill at your own speed and level. So whether you're a web designer, print designer or just wanting to edit some family photos, you can get to it quickly and easily using these free video guides. (more)
thank you so much. it really helped me alot. i mean, it is better to teach
in this way how we can imply to our model rather than create the whole damn
models.. u know.:) hope these kinds of videos to be uploaded more ! thank
you once again :D
May anyone teach me how to make the mouse pointer color ? I mean the red
color orbit (hope people called it orbit) around the mouse.
And I saw people’s pointer will become a complete orbit once done selection
also.
Excellent. I always forget how versatile the FFD mod can be. One
question. Why did you switch from local to world?
Brilliant! Thanks a lot! It’s really usefull
like it very much! demonstrations on each method are very clear, please do
more tutorials
Thank you ! Great video.
From one Paul to another this is one of the best tutorials on Spline to
organic I’ve seen. I use FFD a lot while box modelling. You also explained
this very well. *subscribed*
You are amazing! I’ve been looking for a decent tutorial of this for so
long. I hope you upload more videos :)
Amazing! It’s incredible – from the point of view of a beginner like me…
– how a couple of tools (FFD 4x4x4 and Soft Selection) can ease your work
and boost it faster and smoother in just a few, simple…let’s say
“chirurgical” adjustments! Thank you Mr. Fatkins!
your Style in the Explain better than of the company’s representatives
thank you ^^
*______*
Some Of Company representatives: (
3ds Max Spline Modeling Technique
Amazing …. Thanx a lot … now i can finish my project hehe
thanks alot I learned a lot with your video
great tut! it was very useful for me
Valeu muito show
Same process – I did another example “3ds Max Tutorial – Organic Building
in 3ds Max – Workshop 03 – Part I” continues to Part V look it up on youtube
Great examples. You forgot to mention with the Sweep option, your original
line is still parametrically linked in the stack. If you converted it to
editable spline before sweeping (same with the custom shape) you could have
adjusted the shape of the sweep by dropping down to the line path of the
sweep, and push or pull the vertices of the line path to change the shape,
or if you chose instance as the custom shape type, you could adjust the
shape, and the changes reflect on the sweep.
thanx for sharing