
Skin Smoothing with Lightroom 3
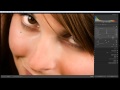
Learn how to use Lightroom to smooth skin, then enhance it further and tweak the eyes and the lips to create that model skin finish! Learn how to use the Adjustment Brush Learn how to use Clarity to smooth skin
Don’t forget to check out our other video tutorials or share this video with a friend.
 0 votes
12 responses to “Skin Smoothing with Lightroom 3”
Leave a Reply to sunshinebaby39 Cancel reply
Video Tutorials
Bringing you the best video tutorials for Photoshop, Illustrator, Fireworks, WordPress, CSS and others.
Video tutorial posted 03/09/12
Category: Lightroom Tutorials

Pages
Random Videos
-

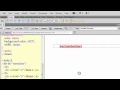
HTML Tutorial: Coding a Website in Notepad
13,352 views
-
C# bluetooth tutorial 1
9,048 views
-
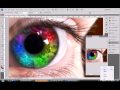
Photoshop CS4 Rainbow eyes tutorial.
5,940 views
-
Video Categories
- 3DS Max Tutorials (150)
- After Effects Tutorials (160)
- C# Tutorials (121)
- Colour (6)
- Crazy Effects (1)
- CSS Tutorials (120)
- Dreamweaver Tutorials (139)
- Excel Tutorials (127)
- Featured (10)
- Fireworks Tutorials (131)
- General Effects (9)
- HTML Tutorials (143)
- Illustration and Vector (1)
- Illustrator Tutorials (174)
- IMove Tutorials (119)
- Lightroom Tutorials (145)
- People and Faces (3)
- Photoshop Tutorials (169)
- Text Effects (7)
- Uncategorized (32)
- WordPress Tutorials (140)
Tags
VideoTutorials.co.uk
-
Videotutorials.co.uk offers the web's best Photoshop tutorials, Illustrator video guides, CSS and HTML tutorials and much more all in one place. With new videos being added every day, you can learn how to master software and code to give your images and website some great effects.
Our site has beginner, intermediate and advanced video tutorials of varying lengths so you can learn a new skill at your own speed and level. So whether you're a web designer, print designer or just wanting to edit some family photos, you can get to it quickly and easily using these free video guides. (more)
Hi, it’s still available in LR4, simply select the brush tool from the Develop Module (D on the keyboard) and if you look at the palette that appears below the brush you’ll see the word Effect: To the right of it it will have something like ‘Custom’ or another preset listed, simply click the word and that will expand a full drop down list of predefined settings. Skin Smoothing is towards the bottom.
I hope that helps :0)
I have lightroom 4, and i cant find the drop down menu to click soften skin can anyone help me?
Thank you! 🙂
thanks so much, more pls!
can you show us how to blend colors in lightroom 3 like PTS ?
Really helpful, thanks
Very good, helpful video. Thank you.
when i stride the brush the hightlight is grey.. i only got to see th result after i press done.. please help
My pleasure :0)
Thank you! This was very helpful..
Nice tip, I’ll check it out later :0)
When your using brushes, press O on the keyboard and the mask shows all the time 🙂 i know it works on mac so it should work in pc 🙂