
Black and Whiting and Advanced BW Toning – Lightroom Video Tutorial
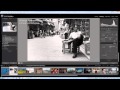
It’s time to move on to Black and Whiting. Lightroom’s Black and White features are simple and quite intuitive, so this chapter will be short and sweet, but very useful nonetheless. In this Lightroom video tutorial, we are going to walk through two examples where we will be taking Color Corrected images from previous tutorials in the Color Correction Chapter and turning them into black and white images. In the second image example, we will go a little further and teach you some advanced black and white toning controls in the Black and White Mix Panel. These Black and White Mix options give you a little more control over black and white toning. Enjoy the tutorial!
Video Tutorial Rating: 4 / 5
Don’t forget to check out our other video tutorials or share this video with a friend.
 0 votes
3 responses to “Black and Whiting and Advanced BW Toning – Lightroom Video Tutorial”
Leave a Reply
Video Tutorials
Bringing you the best video tutorials for Photoshop, Illustrator, Fireworks, WordPress, CSS and others.
Video tutorial posted 21/11/12

Pages
Random Videos
-

HTML5 Tutorial – 1 – Introduction
7,268 views
-
-
After Effects Intro – Free Template Tutorial
8,904 views
-
Video Categories
- 3DS Max Tutorials (150)
- After Effects Tutorials (160)
- C# Tutorials (121)
- Colour (6)
- Crazy Effects (1)
- CSS Tutorials (120)
- Dreamweaver Tutorials (139)
- Excel Tutorials (127)
- Featured (10)
- Fireworks Tutorials (131)
- General Effects (9)
- HTML Tutorials (143)
- Illustration and Vector (1)
- Illustrator Tutorials (174)
- IMove Tutorials (119)
- Lightroom Tutorials (145)
- People and Faces (3)
- Photoshop Tutorials (169)
- Text Effects (7)
- Uncategorized (32)
- WordPress Tutorials (140)
Tags
VideoTutorials.co.uk
-
Videotutorials.co.uk offers the web's best Photoshop tutorials, Illustrator video guides, CSS and HTML tutorials and much more all in one place. With new videos being added every day, you can learn how to master software and code to give your images and website some great effects.
Our site has beginner, intermediate and advanced video tutorials of varying lengths so you can learn a new skill at your own speed and level. So whether you're a web designer, print designer or just wanting to edit some family photos, you can get to it quickly and easily using these free video guides. (more)
Very informative. If you know the yellows are responsible for the weird effect in the clouds along the top of the ridgeline, why not just go back and lighten the yellows in the “Black & White Mix” sliders and leave the clouds as dramatic as they were?
thx very useful
Amazing tutorial man. I’m going to try this out!