
3ds Max Tutorial | Low Poly Building for Complex Scenes + Building Texture
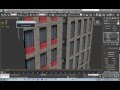
Hey YouTube! In this video, I show you how to model a low poly building in 3ds Max. They can be very useful in complex scenes! Hope you like it! If you do, b…
Video Tutorial Rating: 4 / 5
Don’t forget to check out our other video tutorials or share this video with a friend.
 0 votes
23 responses to “3ds Max Tutorial | Low Poly Building for Complex Scenes + Building Texture”
Leave a Reply to Jake Roose Cancel reply
Video Tutorials
Bringing you the best video tutorials for Photoshop, Illustrator, Fireworks, WordPress, CSS and others.
Video tutorial posted 12/04/14
Category: 3DS Max Tutorials

Pages
Random Videos
-

PHP,HTML Tutorial // POST, Table, Forms
4,065 views
-
Basic iMovie “How to Use” Tutorial!
6,931 views
-

-
Fashion illustration – Part 1
3,900 views
Video Categories
- 3DS Max Tutorials (150)
- After Effects Tutorials (160)
- C# Tutorials (121)
- Colour (6)
- Crazy Effects (1)
- CSS Tutorials (120)
- Dreamweaver Tutorials (139)
- Excel Tutorials (127)
- Featured (10)
- Fireworks Tutorials (131)
- General Effects (9)
- HTML Tutorials (143)
- Illustration and Vector (1)
- Illustrator Tutorials (174)
- IMove Tutorials (119)
- Lightroom Tutorials (145)
- People and Faces (3)
- Photoshop Tutorials (169)
- Text Effects (7)
- Uncategorized (32)
- WordPress Tutorials (140)
Tags
VideoTutorials.co.uk
-
Videotutorials.co.uk offers the web's best Photoshop tutorials, Illustrator video guides, CSS and HTML tutorials and much more all in one place. With new videos being added every day, you can learn how to master software and code to give your images and website some great effects.
Our site has beginner, intermediate and advanced video tutorials of varying lengths so you can learn a new skill at your own speed and level. So whether you're a web designer, print designer or just wanting to edit some family photos, you can get to it quickly and easily using these free video guides. (more)
Hey buddy 🙂 Thanks a lot for your efforts. I’m a beginner in 3D Max. Just
finished your tutorial with cloth falling. I’ll make sure to watch all of
the tutorials you did.
No, shrinking won’t do any harm, it was enlarging that I was talking about!
Thanks 😀
Yes, yes we do have that. Actually now that I look back, I have no idea why
I did it the way I did 😀
thanks very much. if i were u, i use right click then select scale, not use
calc. 🙂
You can do it by using boxes as walls, but this is a low poly building for
far away shots 🙂 There’s a video by bunnyboxx that shows you how to model
an apartment. It shows up in my Suggested videos 😛
you shoul have used swift loop instead its way faster
I doubt it, if you can get a texture that fit perfectly, you’re lucky,
otherwise you’ll have to create one yourself!
Hmm. I didn’t know that. Does it create a material with bitmap diffuse etc.
automatically then? 🙂
Very good tutorial! Thanks a lot!
btw before converting to editable poly, you should change width and length
segs to 1 (in the modify tab) to remove any unwanted edges. great tutorial
– thank you 🙂
good tut ….. swift loop is the way to go and when you set out your plane
make sure it’s length and width Segs are set to 1 that’s why you had extra
lines
one comment how did you get rid of the extra quickslice lines, I didnt
quiet catch that
Well, if you made all the connecting edges, then you should be able to
select it.. Try restarting max..?
There are so many ways to do stuff in max. takes time to figure out what
suits you best. Also try the symetry modifier and rotating the symetry
gizmo around to add in the other walls. Much handier than the arrays imho 🙂
That you can do by clicking one of the segments of that extra line, holding
down SHIFT and selecting an adjacent segment. That should select the entire
edge. Then hit Backspace. Be sure to go to Vertex mode and remove those
additional vertices as well!
AWESOME!!! THANKS A LOT
Or Ctrl + Backspace does the same 😉
thank you so much!
I given that up, use Swift Loop, much easier to use 🙂
I got a fan when I input into the array :/
i am not able to select the windows as you do on 6:12, do you know why?
thanks for the video!!!